Pages

Saturday, June 4, 2022

Panzer strike Western front 1 - first playthrough


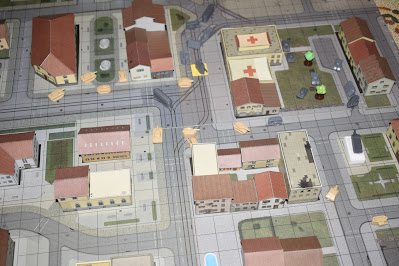
As we made a bunch of photos during our first play-through, here's a quick battle report.

We used no scenario, and just picked our forces similar to what we would field in let's say Flames of war. I was the German, with a single Tiger I, a platoon of 3 Panthers, a platoon of 3 PzIV's, a pair of Hetzers, and a pair of T38's, making the total of about 93 points.

Zoey was the Brits, and she fielded about 3 platoons of 3 shermans with a single firefly in each, a platoon of 3 stuarts for about 100ish points. 

We deployed in opposite corners of the town, and decided to make the deployment zones 10x4. In retrospect, they could have been much smaller, but we should have had multiple zones to deploy, as the terrain density pushed the main clash down the middle of the board, with the flanking forces being next to useless as they took their sweet time to move up the board.


The two trams the game comes with we set up down the middle, not having the slightest idea how much impact their cover will provide during the game.

Zoey's brits push on in two main groups, with the first using the tram for cover, and getting the crew of one of the shermans injured (the crew markers were not setup for this first game, so we used the immobilization ones instead). The other group was yet unsure weather to pursue the flank, or to reinforce the middle, expecting high losses there as they see what awaits on the other side.

The Germans split into 3 groups, with the middle one (on the tram tracks) being the smallest. The intent was to flank the enemy on both sides.

The middle road starts to open up a kill zone, while the trams end up as a perfect cover.

The tiger is already making a mess down the middle road. The panthers decide to join the middle clash. The shermans are unable to score a hit.

The carnage at the center of the town.. 

The brits decide to try and push the flank, and manage to destroy a T38. A firefly kills a panther from the front.

The flanking pzIV's end up useless as the game was over by the time they got a line of sight to anything.

The final turn sees the flanking Germans trying to reach the enemy.


Another panther gets killed by a firefly on the flank. In return, the hetzer manages to destroy one of the flanking shermans.


We decided to end the game after turn 6, which shouldn't be the case in this game. The allies lost most of their vehicles, so they decide to retreat, while the axis lost 2 panthers and a t38.


Panzer strike Western front 1 - core rules overview


This article will be about the rules aspect of the game, and the actual gameplay.

We tried out the core rules. Compared to the dynamic set, this is more robust and complex, and I would say a more realistic set of rules. It reminds me strongly of GMT's Panzer, and I have a feeling that the upcoming Advanced upgrade set will just highlight this even more. 

Lets cover the information cards first. You have your point cost for the given rules set, the miniature/figure image for ease of recognition, than several movement based stats, such as max speed if not reversing, reverse, drive type etc.. Than you have the armor stats, for the front, side, back, top and tracks.. Next is the weapons with the range, which accuracy dice to use, penetration of the gun, type of ammo (AP or HE for now, with more to come in the advanced upgrade), weather the gun can fire point blank or not, and the range for parabolic fire. The cards do look good, and all the relevant information is displayed, along with some bits that are not being used for now (like weight).

The core rules have several sets of dice with specialized symbols on them, though most of which will be used later in the upcoming Advanced upgrade expansion. The first one you use is the speed die, which similarly to Forsage’s Age of dogfights series is rolled just before activating a unit, and it brings a spot of randomness to the speed of any given vehicle. It could remain the same, or go -1 or +1. This does slow the gameplay a bit, as you have to roll multiple times during your turn, but the random factor it creates is amazing, as you can never be 100% certain if your vehicle will manage to cross the open street in its turn or will it get stuck just before going round the corner. I have a feeling this will be more expanded upon in the Advanced upgrade expansion, with the mentioned cruising speeds, and engine overheating.

Next you have 4 separate sets of accuracy dice, in pairs of 2. They are color coded, so green for worst, blue is slightly less bad, purple is good and red is best. Every vehicle has its dice set in the information cards (so for example red for the panther, blue for the 75mm sherman..), but again this could change in the future given the idea of crew experience. When you pick your target, you measure the range with the ruler and line of sight, and roll your designated pair of dice. To hit the target you must roll equal to or higher than the range. The better the pair of dice, the greater your chances are.

Here I must point out how player friendly this system really is. The accuracy dice are color coded, but they are also numbered, which at first glance creates confusion, as you search for the third purple die etc. In fact, the numbering is for color blind players, to easily identify the set they need. 1 for green, 2 for blue, 3 is purple and 4 is red. Bravo Forsage! 

If you hit the target, you must then roll a hit die. This might have been a poor choice for a name, as you have already rolled your dice to hit the target, thus making this a Location dice perhaps. You can’t really call it just a white die as there are 2 more of that color too, plus 2 more colored that you can roll for location. This die will tell you if you hit the tracks or the body, with the tracks being 1 in 6 chance. Each side has multiple other markings that are meant for the advanced upgrade, so I can’t comment on them now. But if you are close enough to the target (depending on the color of your accuracy dice) you can declare you are trying to hit the tracks on purpose, perhaps having no chance of penetrating the target from that angle, or in fact you want to make certain you hit the body and avoid wasting a powerful shot just to immobilize the target. These dice also have multiple other symbols on them, where only two X’s are used currently. If you moved and rolled the red X than you missed, and if you have a hull mounted weapon and rolled a white X than that’s a miss as well. 

Now you reference the ruler, as AP weapons degrade their penetration power, check the armor value depending on the angle of the attack, and roll another die. This one is very similar to the speed die, and can push the penetration even further with +1,+2.., do nothing or even decrease the power. These again have multiple symbols on them not used in the current game. There is even the option for even more angles, instead of just front, side and rear. If the end result has the penetration total greater than the armor value the target has been destroyed. If its equal than its damaged, which for now, has only 2 options. If the body was hit than the crew was injured. Place a marker for it, and this will do what you expect, no more move than fire. If the tracks were hit than the process is different depending on the drive of the vehicle. In short, the first time the tracks are damaged, the vehicle can still move, but with difficulties, while the second time it gets damaged, its then immobilized and no movement is possible. Repairing damaged vehicles is also possible, either by the brave crew, or a recovery vehicle (which is a bit faster, but you must buy the vehicle first). The crew can be attacked while repairing the vehicle, thus restarting their effort or destroying the vehicle. 

The damage markers are a bit dull to be honest. The crew marker is fine, a semi transparent plastic with a crew symbol sticker on it. The immobilization and destroyed markers are yellow and black large square pieces that slide under the vehicle. The immobilization could have been the same as the crew one, with the sticker being like a damaged cog or something. The destruction marker I guess is supposed to represent the smoke plume spreading around the vehicle, covering the whole space where the vehicle is, but we find that just tilting the vehicle on its side does the job as well. We need to play more, and see if the black marker will in fact create more cover for units behind it. I suspect there will be several more types of damage later on in the game, which I am looking forward to.

The game comes with some other markers as well, like the timer cubes, used for repairing (it takes time to finish the repairs) or some scenario specific goal where the infantry need some time to capture a building.. These are plastic cubes with stickers for them, and do the job well as they are small and don’t get in the way too much. The activation markers on the other hand are as big as some of the vehicles, so when playing with lots of vehicles on the board, this can get even more crowded. We didn’t use them, as we just remembered who has yet to activate. They are necessary, but should have been way smaller than they are now.

Let’s talk about movement for a second. I won’t cover all the details, but there are separate rules for moving tracked and wheeled vehicles (which makes sense). The one thing we didn’t like with the movement rules, is the coordinated movement. It states that depending on the total number of vehicles you have you get a certain number of coordinated moves. This does sound like activating and moving several vehicles at the same time, sorta like a platoon (and in fact we might try it like this), but the rules state that the player moves all of his vehicles, than performs his shooting if possible, then play switches to the other player. So activating several vehicles at a time serves no purpose. This is confusing as the number of activations is on the low side, and the rest of the vehicles can then move just one space. I don’t think we are reading this wrong, as the wording is clear. The intention was to show the confusion of battle, and the fact that the commander can’t be everywhere at the same time to direct everyone. When we played, we skipped this bit, and just activated every vehicle in full. This hasn't slowed play at all. Again we will experiment with creating and activation platoons one at a time, using this rule, interpreting the rule as a number of coordinations the commander can perform to his platoon commanders. This sounds good on paper, as the terrain density of the board WILL cause you to divide your forces into smaller groups.

Now, on to artillery. I LOVE it! Unlike Tank chess, where artillery pieces were rarely useful due to low range and the way shooting is conducted in a straight line, here you have a feeling your batteries are an integral part of your plans. You have medium and heavy SP howitzers, and medium and heavy field howitzers. Their range is, although not realistic, very good in game, allowing you to cover a large portion of the board. Obviously you will want to use cover as much as possible. This way your guns will require an observer to operate. You can have any one of your other vehicles be the observer for the turn and report the position of the target. The rules get even more cheeky here, and mention that not all of the vehicles in the game were historically equipped with a radio, in case you want to go full grognard. This will make your light tanks and armored cars super useful. Ok, so how does this work? First when you activate the observing model, you check if it already has a line of sight to the target (this is not modified by cover). If it has, the die roll to report the coordinates for the strike is much easier. If not, it has to move to get into a better position, which in turn makes the roll much worse. To fire, your battery places a template next to it self to check if parabolic fire is possible, then places the template next to the target to see if it is possible to hit it, or it is too close to a building. You then roll the accuracy dice as usual, followed by a new die to see which part of the target you hit, which makes it possible to hit the top armor. If you didn’t hit your primary target, you then roll two lets call them scatter dice, which will show you if your shot scatters into any of the 8 spots around it, or if it missed. I love this so much, how a simple boardgame can make artillery fire so involved, unlike some more famous miniature games that ignore the concept of scattering into a new target. For now there is no smoke in the game, but i’m sure it would be easy to add it in later. Like once per game/per battery, a large white square template/marker 3x3 squares in size, can fire on open ground, place a timer on it to mark its duration, lets say based on the number of guns firing smoke, lasts two turns per weapon. 

Onto the vehicles then. We played with the core rules, and historic pieces. These don’t allow the Germans an armored car, which is a shame, an sdkfz 222 would fit perfectly, either the standard autocannon model, or the pzbuche41. Also the T38 being super obsolete and yet with poor performance for a light tank could have been a Pz II “Luchs”. A perfect fit for a scout. More speed, less AT. We will have to playtest this into our games. The wife had some 3 platoons of shermans with a firefly each, and a platoon of stuarts, while I rolled a platoon of pzIV’s, panthers, a single tiger I, and a pair of hetzer’s and t38’s. I tried to make a balanced choice, similar to what I would use in let’s say Flames of war. The difference between the vehicles in the same category could be felt, as the t38’s were cr*p obsolete, while the stuarts were zipping about. The shermans felt average as there were many of them, the fireflies were a precious commodity. My tiger and panthers were doing all the work, while the rest were trying to get into flanking positions. They all felt balanced, though we still have many more to try out. 

Now, what we felt is a missed opportunity here, the Germans could have an armored car, the light tank could be a different one, there are no stugs, but there is the maus, there is an SPAA vehicle with no clear purpose as there are no planes. The allies on the other hand are a strange bunch, with a mix of American and British vehicles, not really here, nor there. In fact, if you take away some 3-4 vehicles, the rest are pure British. We felt that by adding a few models to each group there could have easily been 2 separate armies for the allies.

We're not even sure how long our first game lasted, as we were so involved in the game, which is a very good sign, but I would say no more than 90 minutes. There was almost no checking of the rulebook during gameplay.  At first glance there was some confusion with the vehicles, as these basic pieces have a few that kinda look alike. We felt like we would end up having to print out or otherwise buy some 6mm historical pieces, but I can honestly say that after a few turns you get used to what each piece is.

We loved the game, and can't wait to try out all the different vehicles. I hope that at some point in the future this game gets an eastern front variant with more open spaces. We recommend this to both board-gamers AND miniature wargamers as it has something for both groups.

This leaves us with a third article based on the dynamic set of rules for next time.


Heroes of normandie by Devil Pig Games


One of the universes great many wrongs has started to right itself. After years of regret that I traded my Heroes collection, the heroes are finally back! 

We're still waiting for the new core set and the d-day battlepack, as well as hoping to find the Gazette #3 set.

That will probably be it for Normandy, until Caen comes out. We do plan on getting the Stalingrad core too.

Can't wait to start playing!  The first time we had this gem we weren't so keen on making up home-rules for things we didn't like. The one thing that we couldn't wrap our heads around was the activation system where most things could just move OR shoot, thus giving an enormous advantage to the player that gets into position first.


Saturday, May 28, 2022

Panzer strike 1 Western front, by Forsage games


Recently we received a copy of Forsage’s Panzer strike 1 Western front. This article will be just the first impressions of the components, while the actual gameplay will be in a follow-up article. 

The game comes in a big box. Think an average two player miniature game starter size. The latter is easy, assemble the minis, store the extra bits, and chuck the box. This is a boardgame so you’re supposed to keep it to store the game. Now, this one is a bit trickier  as you have a fair bit of assembling to do (the terrain), but when done, you will have trouble fitting everything back in the box, and closing the lid.

As most gamers familiar with Forsage’s titles will know by now, the game box is full of components, and there will be a lot of assembling. This time the minis don’t require any extra work, but the dice still do, as well as all the buildings, and a few of the extra components. There is a good instruction manual included, with a visual guide.


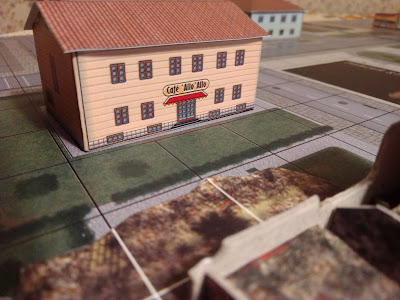
Let’s talk about the buildings first. There are a great many of them, and they represent most of what you might expect to find in a small town near the end of WWII. I point out “most” as there are expansions planed, as well as stand alone titles, that can be linked to the previous game boards. There is a “small” sneak-peak inside the game box itself, of some of the components and terrain from the follow-up game Panzer strike 2. There is even a small homage to a famous tv-show. See if you can spot it in some of the images.

Every building, or a set of buildings has its location marker underneath, which corresponds with the same alpha-numerical markings on the game boards. This does limit the variety every time you play, especially as the game boards must connect in a certain way, so you can’t make a different town each time you play. Would the game have more replayability if the game boards didn’t have large black markings for where the building go to, thus allowing the player to make a new board each time? Perhaps. But, here lies something very cool and unique. The game comes with an extra set of ruined buildings, which are meant to replace some of the buildings in the game. Not all of the buildings come with a ruin, but about 30% of them, and they do change the scenery a lot. I can’t wait to go through the rules to see how this interacts during the game. On the one hand, you have a fixed town, that looks the same each time you play, but on the other hand, you have ruins to replace some of the buildings where the heaviest fighting was going on earlier.


The game boards are large, and form a good looking playing surface being so full of details.

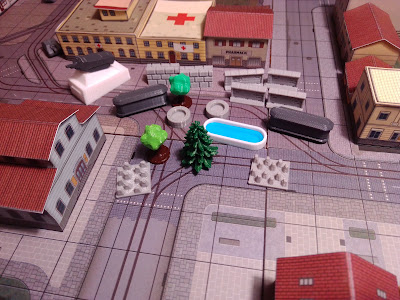
There are a few extra scenery bits included, such as walls, barricades, trams, trees, fountains, monuments and tank traps. Some have a prefixed place on the boards, like the fountains, and some can be fixed by the scenario, or allow the player to place them where he feels they would benefit him the most, like the high and low barricades.


The game is intended to come in two different “variants”, with the standard one having figures that we saw in Tank chess (those unfamiliar with that title I suggest to check it out), for more generic looking pieces. The deluxe variant will have proper miniatures, 6mm scale, for the Germans and the Western allies. To my knowledge no other difference is planed between the two variants.

Here lies a second surprise. The information cards for the minis have a few variants of their own. You can play the minis as generic pieces (like in Tank chess), which we feel would be easier on the younger audiences, and nation specific pieces. Not enough? There is another surprise. There are in fact TWO sets of rules included. The Core rules, and the Dynamic rules. And the stat cards for generic and nation historical for both sets. The point costs when building your forces are different depending if you are playing the core or the dynamic rules.


While on the subject of the historical units in the game, we had a little gripe with the game here. The game is set in a French town, so the year is 1944. However there are a few vehicles that first showed up later, even in 1945, and there are some that were obsolete by 1944, then some that barely saw any combat even before 1944. The allies feel like they could have been limited to the Us vehicles, than later expanded with a Uk set of vehicles of their own, thus allowing each set to feel unique with its own iconic pieces. I can't comment on the stats yet, i'll leave that for a future article.

All the pieces from the basic set are of good quality, and in fact feel like an updated sculpt of the Tank chess pieces. However the antitank guns and the howitzers are of significantly lower quality being 3d printed in low res. Both players get the same pieces, in different colors, and each can be easily identified by referencing the stat cards. The basic set doesn't include all the gun pieces the deluxe will have. 


The game is about tank combat, but there are a few instances where infantry appears, like with anti tank guns, and in scenarios where you have an abstract infantry squad or two, in transports, and they need to get somewhere in town, to occupy some building to achieve a goal set by the scenario. Some scenarios even have a sniper in a building, where you need to be extra careful with your squad. There is no infantry on infantry combat, so no vehicle has any stats for Mg fire.

Would the inclusion of different types of infantry, with its own weapons make for a better game? I don’t think so. Certainly not with 2 sets of rules, and a generic and historical set of stats. Just the idea of infantry holed up in some building with a stash of hand held antitank weapons would take away the World of tanks vibe this game already has. It would also break the “MCMD” motto Forsage is well known for.

There is an expansion in the works, along with Panzer strike 2. The expansion will add optional rules, new control panels, and new markers. The rules will add different speeds, engine heat, moving targets to lower the chance to hit, target size, overwatch, optics quality, different shell damage, and new ammo types, shell loading time, crew experience etc..

There are two different sets of dice included. One for the Core set of rules, and the other for the Dynamic set. Apart from the essential d6’s there is a plethora of other 6 sided dice. The dynamic rules set has just numbered dice, while the core has a ton of details, all of which will be covered in the rules article. 


We love the fact that there is several types of vehicle damage in the game, with even more to come in the advanced upgrade set. 

The scenario book comes with 10 scenarios, 5 are generic, with marked deployment zones on the map, and a few obstacles, while the players choose their own forces, with no specific goal, and the other 5 are more narrative in nature, each with a story behind it, and a set of goals for each side, again the players get to choose their own forces, but here the scenarios will specify if one side must take something specific, like a truck or a light tank. The rulebook also has a few scenarios of its own.

The remaining components are a pair of reference cards, always welcome, artillery or parabolic fire templates, to check if the vehicle can fire over a certain piece of terrain, and a few others, such as timer cubes, damage markers, turn marker, the rulers etc..


We can't wait to go through both rule sets, and play a few games. Then, in a follow-up article we will cover how both sets work, the differences between them, and how we feel about the game.


Thursday, July 22, 2021

World at war, scenario 3


May 18, 1985, the Soviet juggernaut is on a roll, but it need a steady supply line. The key to that is the Eisenbach bridge, so the 87th motorized rifles are stationed in town to defend it.

The 33rd motorized rifles and further south, defending the town of Hugelsdorf, as a likely point of any American counterattack.

The 1st tank btn is held in reserve to the north.


The Americans decide not to use the preplaned artillery strike on Hugelsdorf, instead saving te strike missions for later on.

The dice on the eastern board edge are the entry points for the US forces. 

The Alpha troop surprises the defending Soviets and swings north, behind the hill, with just the M106 mortar section and the HQ setting up on the hill.

The Delta company enters through the southern point, and sets up in good firing positions across the river from the defenders. They manage to take out all of the 33rd's AFV's, and next turn even pin most of the infantry, especially the ones with the Sagger ATGM, with a little help from the mortar section.


With just infantry remaining the Delta's tanks are unsure how to proceed, only one plt probing the defenders with HE fire. 

The Soviet infantry on the other hand has had enough, and the 2 unpinned platoons assault the closest tank platoon, utterly devastating it. 


While the remaining Delta tanks being confused by what just happened, the infantry seize the initiative, and assault again, this time at the platoon in town, just across the bridge, making short work of it. The remaining Delta platoon and hq decide not to counter-assault the Soviets, after witnessing how brutal close quarters combat can be, especially in town, so instead they pepper the infantry with HE fire. With a few lucky hits they manage to clear the infantry threat, and decide to head out after Alpha troop, leaving the remaining pinned enemy infantry in town for the mortar section.
 

On the other side of the map, Alpha troop's Abrams plt and 2 Bradley plt's set up on the edge of a forest on a hill overlooking the objective, thus triggering an alarm within the 87th troops, who, until this point were unaware of the enemy, and were unable to activate.

The alarm was noted by the approaching 1st tank btn reserves, who surround the Americans in the forest. The T-72's are unable to disrupt the Americans, due to them only just arriving, so the older T-55's are sent from the garrisoned town to assist.

The Soviet tankers manage to take out the Abrams plt, and reduce both Bradly's to half strength. In turn, over half of the 1st tanks AFV's are destroyed.

Zoey discovers the benefits of a well timed tactical retreat, so escapes with the remaining Bradly's, buying just enough time for the remaining Delta companies tanks to reach them, so they can strike together. 

Alpha troops command uses its last available smoke mission to cover the advance of the joint strike force, allowing them time to set up a decent firing position at the defenders, as none of the Soviets are able to see through the smoke, unless adjacent to it.


With only a few turns remaining, the Soviet command decides not to risk anything, instead hunkering down in town. This enrages the remaining US forces, as they are unable to do much, but take out the closest infantry armed with Sagger ATGM's with mortar fire before they get a clear line of sight to any of them. The Abrams and manage to reduce a few tanks, while the Bradly's kept running out of TOW's to fire. One of the Soviet T-72's manages to knock out one of the Bradlys before the game ends. 

In the end, the Americans failed at their objective to seize the town of Eisenbach along with its bridge. The Soviet defenders were just too numerous for them to handle.

The Soviets lost the entire 33rd motorized formation, more than half of 1st tank btn, and all the infantry elements of 87th, with the T-55's all being reduced to half strength.

The US forces lost 2/3 of the Delta companies Abrams tanks, and half of Alpha troop.


This was a great game. I was pleasantly surprised with Zoey's tactics, not losing sight of her objective and the scenario rules.The 87th couldn't activate until the turn after they first get line of sight of the enemy, so she kept to cover. I fully expected both Alpha and Delta teams to strike at the southern defenders first. This was such a surprise to me, as I, with a decade of gaming experience more than her, am still struggling in most games to focus on the objective, instead going for a firefight, to cause as much damage as possible, thus losing track of what needs to be done.

The assault rules are brutal. I was afraid of the Delta company with its 3 Abrams platoons, and with good reason. Lucky for me, that 2 infantry companies with their Rpg-7's are super deadly in an assault. 

I've come to realize that we keep messing up some of the rules. Like, the concealed units, would get an additional defense die if they haven't activated yet, or are in overwatch, unless either an enemy unit reveals their position while adjacent or an enemy recon unit has line of sight to them. This would have had an impact on our games, but since both of us missed it, we will implement it in further games. Then, infantry has a save value of 5+ instead of 6+ while in terrain. This would have also made an impact, as infantry are able to have more defensive bonus dice than tanks, due to being concealed, in terrain, with wrecks. I must keep an eye out for this. We are still having trouble with some tanks, like the T-55's this time, who I forgot could fire at extended range, instead I kept driving them around. I must remember that underlined range means its an ATGM weapon, with no extended or short range bonus, and the underlined Firepower means the unit can move and fire. Every unit without an underlined range can fire at extended range. Also, something we missed last time, HE fire is affected by moving the same as AP fire, so most units are unable to move and fire their HE weapons. This also means that most infantry are also unable to move and fire, making assaults even more important.

Next scenario introduces helicopters and anti aircraft weapons.  


Monday, July 19, 2021

World at war, by L'nL publishing, scenario 2


May 17, 1985. Soviet 33rd Motor Rifle battalion broke through the American lines. The Soviet's objective, the capture of all towns along their way, as well as both bridges over the Klappebruck river. Team Bravo was sent to stop them.


The Soviets have 3 companies of old T-62 tanks with their HQ, plus 6 motor rifle companies mounted in their Bmp-1's. The infantry was carrying 2 sagger's. The command has authorised the use of 2 HE artillery strikes, and 1 smoke mission.


The American combat team had 2 platoons of mechanised infantry in M-113 transports, each with their own dragon ATGM. They were backed up by a platoon of Abrams tanks, an ITV section, and a section of TOW jeep's.


The Soviets burst into view around the town of Rumwald, while the Americans, due to their low numbers again have to divert their forces. 1 mech infantry platoon with ATGM's is defending the town of Klappebruck, the tank platoon is on a hill overlooking the Soviet approach. The other infantry is defending Eisenbach. The ITV section is hiding in a forest with a good field of view, and the TOW jeeps are on a hill near them as well.

The Soviet's opening move is cautious, getting into position, with enough firepower pointing at the Abrams, considering it as the greatest threat. However, the old tankers in their T-62 show their tovaritch how its done and knock out the Abrams tanks themselves. The infantry all dismount, and some even assault Klappebruck, managing to destroy the enemies there, and take the town with no casualties. 


A few ATGM's from Eisenbach manage to knock out 2 companies of Bmp's. The Tow jeep gets trigger happy and runs out of ammo.


Aftermath of the bloody assault
                             

With the first line of defense gone, the Soviets divert their forces, one half crosses the river, going for the far objective, and circles back to clear out the enemies on that side of the river. The other half is closing in on Eisenbach, on foot.


Team Bravo is out of luck. Its last remaining troops are quickly surrounded around the last objective, and destroyed in a firefight. 

The Soviets claim a major victory, having seized all their objectives.  


The casualties of the game

Zoey has never experienced such bad luck in any game, and is now heartbroken. Now she knows how I feel when she does the same to me.

Having the T-62's destroy the Abrams platoon so early on, was a surprise to both of us. I didn't expect those tanks to do anything, so I was preparing first turn, setting up and infantry company with saggers, and a few with just their RPG-7's to all have a go at the Abrams, along with a couple of Bmp-1 companies with their ATGM's.

My save rolls were above average this time, but Zoey's were abysmal though, even by my standards.

We made sure to check up on a few rules during the game, to avoid any mistakes as much as possible. I believe we missed one roll for terrain save against an HE artillery strike. The biggest issue could be the concealment rule, so I will reread those for next time. I'm glad we tried out the assault rules, as they're awesome.
Next time, its the Americans who are trying to take back the Eisenbach bridgehead. Lots of armor, on both sides.